Cylinder Inspection Training: Why a Maintained Cylinder Is a Happy Cylinder
Uncover the importance of gas cylinder inspections and training. Dive deep into ensuring safety, boosting efficiency, and prolonging cylinder life.
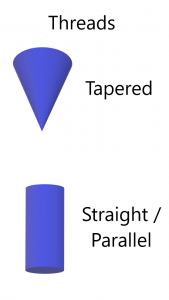
A cylinder cannot serve its purpose unless it can contain pressurized gas. The way a cylinder maintains the pressure, and allows the cylinder to be refilled, is through the use of a valve. A properly working valve will contain a gas and allow the gas to be released when required. A properly working valve will also help to ensure that gas does not leak between uses. For the valve to work properly it must have a tight seal with the cylinder. This can be accomplished with tape or paste and proper torque on a tapered valve. Or it can be accomplished with an O-ring and clean gland area with a parallel/straight valve.

If the threads are not clean, there is corrosion on the O-ring gland area, or there is not enough torque, pressurized gas can leak from a cylinder. If any of these concerns are not located before the cylinder is pressurized, it is too late. By the time the issue is recognized, the gas that was placed in the cylinder needs to be removed, and the inspection process completed again to ensure the integrity of the cylinder. It is optimal if the inspector ensures there are no damage or corrosion issues before the gas is placed within a cylinder.
The valve inspection is accomplished before the valve is placed on the cylinder. The valve inspection is normally straight forward. If the valve has been damaged, the damage may be obvious. The hand wheel may be damaged, the valve itself is bent, or valve pieces are broken. The one area that should be thoroughly inspected, with less obvious damage, is the valve threading. The Peaks and valleys of the valve threads should be sharp and precise. They should be this way from the top to the bottom of the threading. The inspector can use a magnifier for a close inspection, and/or run their finger over the threads to ensure there are no rounded peaks or sharp burrs.
The threading within the cylinder opening should also be sharp and free from corrosion. The cylinder’s thread inspection should be more time consuming and precise. The use of a light and mirror or Cylinder Thread Viewer needs to be used to ensure there are no cracks, corrosion or other damage which may affect the sealing properties of the valve or integrity of the cylinder.
If the threads on the valve and within the cylinder are not damaged the valve should thread easily into the cylinder. A straight/parallel thread system should mate together with no force until it has reached its final sealing position. If the valve stops, or seizes while being inserted, the valve may not be properly sized for the cylinder being used. The only time force/torque is used, when inserting a valve into a cylinder, is during the installation of a tapered thread valve.
A tapered thread uses a small amount of paste or tape to act as a protectant and minor sealant. The torque of the tapered thread into the cylinder acts to contain the gas. On a properly working and undamaged tapered thread, you apply two wraps of Teflon tape, and turn the valve clockwise with your hand until it stops. You then apply enough torque to contain the gas. That normally requires two turns with a wrench or tightening device. The amount of torque is dependent on the valve manufacturer and cylinder manufacturer, so you might get a differing torque value. The general rule of thumb is two turns, after hand insertion, using a tool or enough torque to contain the gas.
A parallel thread system is a little simpler to check. Since the O-ring is the primary sealing component, torque values are not as extreme. For a parallel or straight valve system, ensure there is not any damage to the threads of the cylinder or valve threads. It is strongly encouraged to replace the O-ring when re-inserting a valve. The O-rings are static (non-moving), but they can become misshapen. A small amount of lubricant is used on the threads, to act as a protectant from galvanic corrosion. When the valve is placed within the cylinder, it should be accomplished with only the use of a hand and screwed on without resistance. If the valve seizes before it is inserted all the way, it may be the wrong type of valve. Once the valve sits securely within the cylinder, and the O-ring is within the gland area, 40-70 ft/lbs. of pressure should be adequate to snug the fit.
If a tapered valve leaks after application, you have a few concerns to check:
If your parallel/straight threaded system leaks, here are the common concerns:
This last two points are commonly overlooked. When conducting a proper visual inspection, use a magnifier on the O-ring gland region of the cylinder. If the O-ring gland region is corroded, or shows signs of wear, the O-ring can not perform as designed. The O-ring is pushed against an uneven, or pock marked surface, and the gases escape through this uneven surface. This uneven surface is difficult to detect, without the aid of a magnifier. With the naked eye, the O-ring gland surface may appear smooth. But under magnification, corrosion is detected.
If the cylinder has a corroded O-ring gland surface, you can attempt to clean the surface with a cylinder O-ring gland cleaning kit. Most of the time, this is adequate. However, if the surface is corroded, and pock marked, the cylinder must be retired. The cylinder is not unsafe. The valve will remain within the cylinder, but it won’t be able to contain the gas. The cylinder should be retired because it can no longer contain a pressurized gas.
Taking the time to inspect a cylinder, only to find that gasses escape from around the valve, is frustrating and time consuming. Not to mention the cost of refilling a specific gas within the cylinder. It is best to perform a proper inspection and ensure surface areas are clean from corrosion before inserting a valve. Simply adding the step of brushing the O-ring gland region, during each inspection, can help ensure the cylinder contains a pressurized gas.

I enjoy continuing to build the business based on safety since 1999. CTS focuses on the inspection of high pressure cylinders, the maintaining of the valves and basic maintenance of high pressure compressor systems. CTS stays current in techniques and tools to train both the new and novice employee. We publish articles, update training tools and have created an APP to assist during the inspection process.
#cylinder #safety #hazmat #training #cylinderinspectiontraining #cylindex

Uncover the importance of gas cylinder inspections and training. Dive deep into ensuring safety, boosting efficiency, and prolonging cylinder life.

Is your composite cylinder showing signs of wear? Discover when to seek a professional repair service in our comprehensive guide.

29 CFR 1910.101 intro Handling cryogenic cylinders involves working with extremely low-temperature gases that pose unique safety risks. To ensure the safe handling, storage, and transportation of these hazardous materials,

Introduction Firefighters encounter many risks while on duty, including hazardous materials and high pressure bottles. High pressure bottles are used for a variety of purposes in firefighting, including powering hydraulic